
Outpost Packet Message Manager
HOW-TO... Setting up Telnet Access
Setting Up Telnet Access
INTRODUCTION
Why Telnet in Outpost? There are some emergency communications teams
that have a BBSs that is accessible in a networked environment by radio operators at the EOC. In
these cases, EOC Radio Operations can have direct access to the BBS by a wired network and telnet connection without dedicating a radio to that function.
Implementing a telnet connection between Outpost and the BBS requires several things:
- A physical network connection between your Outpost PC and the BBS. This can
be either direct or indirect through a local area network or common router.
- Networking enabled on both PCs. Someone who understands network systems administration will be invaluable here and reduce hours if not days of frustration. Be sure you can confirm that your networking is working on each PC prior to moving on to getting the applications to work.
- A configured BBS with Telnet support turned on.
- A logon and password on the BBS to which Outpost can connect.
- Outpost configured for telnet access.
BEFORE YOU BEGIN
You need the following information to be provided by your BBS or network administrator.
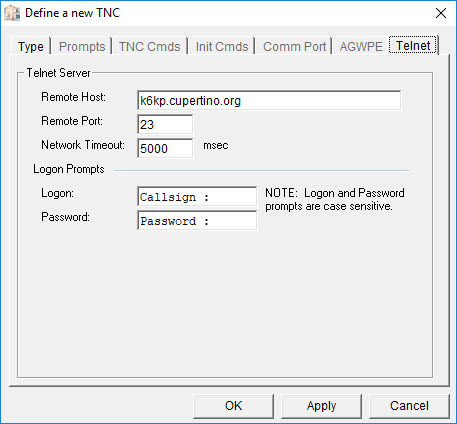
- Remote Host name: either an IP address or network path name.
- Remote Port number: this is usually a 4 digit number.
- Your logon name: typically your call sign.
- Your password: to be set up by the BBS sys admin.
- The Logon Prompt: the string that the BBS presents for you to enter the logon name
- The Password Prompt: the string that the BBS presents for you to enter the password
HOW TO
To use Telnet, proceed as follows:
- Complete steps 1 through 5 above. Do not proceed without confirming these steps
first.
- Collect the information stated above.
- Check out the basic connection. From Outpost Main Menu,
select
Tools > Interactive Packet > Telnet. This opens the "Telnet Interactive Packet for Outpost" program, a telnet terminal from which you can check out and confirm that telnet works.
- In the Telnet program, select File
> Telnet Settings. Enter the Remote Host name, and Remote Port. Set the Network timeout to 5000. Press
OK when done.
- In the Telnet program, press the Connect Button. The program will connect to the named host and present the
call sign Logon. Enter your call sign (logon), press enter. Then enter your password when prompted. You should now be logged on the BBS.
NOTE: if you do not get this far, STOP!!! Contact your BBS or network administrator for assistance.
- When done, enter B (Bye), then press Disconnect. Exit from the program.
- Set up Outpost. First, select Outpost Main Menu,
select
Setup > TNC. Press New, and set the device type to be Telnet.
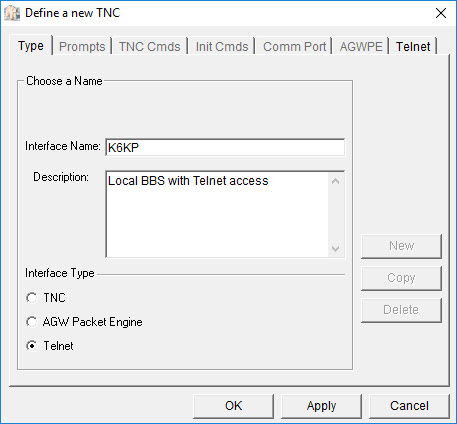
The Telnet tab is enabled and all other tabs are disabled. From the information gathered above, enter the setup information into the fields. See the user guide for more details. Press OK when done.
- Next, set up the BBS (Outpost Main Menu,
select Setup
> BBS) if not already set up. Make sure the BBS Prompt for Telnet is the same as for a radio-based connection.
- At this point, Outpost should be able ready to go. Press Send/Receive and confirm that Outpost connects, sends any outgoing messages, retrieves any messages addressed to you, and then exits.
IMPLEMENTATION NOTES
1. Before deploying Outpost with Telnet into your operations, I recommend a
thorough checkout period for you to understand how the 2 applications work together, note any particularities (and let me know!), and build general familiarity with this new capability.
2. One change you may need to be made is with the F6FBB telnet setup. Bill VE7QC reported that the following change corrected a problem with "stuck packets" where the BBS prompt was not being displayed for large files retrieved by Outpost. In the port.sys file, change the MaxFrame parameter from 7 (in Bill's case) to 1 if you experience this problem...
Before:
# Same number of lines as number of TNCs.
#
#TNC NbCh Com MultCh Pacln Maxfr NbFwd MxBloc M/P-Fwd Mode Freq
6 4 2 t1
250 7 2 20
10/60 UTYW Telnet
After:
#TNC NbCh Com MultCh Pacln Maxfr NbFwd MxBloc M/P-Fwd Mode Freq
6 4 2 t1
250 1 2 20
10/60 UTYW Telnet
General Feedback
Please send any feedback to
updated: October 12, 2008